
Engine oil is the lifeblood of any ICE (internal combustion engine). And with EVs (electric vehicles) slowly becoming more and more popular these days, changing your own engine oil is slowly becoming a bit of a relic of the past.
Fortunately, if you do know how to change it yourself, you can save a fair amount of money. As well as having the satisfaction of knowing you used genuine branded quality parts and the correct branded grade oil.
In this guide, I am going to use my own car as a reference. This is a 2016 Ford Fiesta EcoBoost 1.0 100PS Manual 3dr.
Whatever car you have the process will remain the same but certain areas will change and I will point that out. I will also include links to the parts I used so you can purchase them too. This is a long guide so I will add links below for an index.
So let's get into it. This is our guide on how to change the oil in a car.
Index
1) First things first, collecting the requisite materials and tools
2) Preparing your car for the oil change

First things first, collecting the requisite materials and tools
Having the right tools and materials will make this job ten times easier.
1) New engine oil: Your vehicle's manual will tell you what brand, grade and amount of engine oil to use. You can also use guides like Haynes which are very accurate. My Ford Fiesta Haynes guide is available here but not all cars will be available. Either way, figuring out the brand, viscosity and amount needed is the biggest hurdle.
In my position, I needed between 4 and 4.6 litres of Castrol Magnatec 5W/20. I would suggest always using a branded oil like Castrol as they are simply better than the cheap stuff! Try to avoid supermarkets or shops for oil as you will get overcharged. Amazon sells branded oil at very cheap prices. I got 5 litres of Castrol Magnetic 5W/20 here for just £31 (at the time of writing this), when some physical shops are double that price.
If you're still struggling to find out what engine oil you need, you could possibly visit your local dealership parts & servicing centre. For example, if you have a 2014 Audi A4 Saloon then you can visit your local Audi dealership and the parts team will be able to find out the correct oil for you (and sell it to you!).
2) New oil filter: You can get these from Amazon, eBay or your local dealership parts centre. I personally got mine from my local Ford dealership parts centre. I bought several at once so I didn't have to keep coming back here. Again, if you want genuine parts then it's worth visiting the dealership parts centre. Otherwise, you can find genuine oil filters via eBay but you'll have to consult your vehicle's manual.
You will also want an oil filter removal tool for the old filter. This is because the old filter might have been overtightened by the last person who serviced the car. I personally bought this filter removal tool here from Halfords and it did the job perfectly. It just fits on the end of your torque wrench, which we will get to soon.
3) Oil drain collection pan: Changing engine oil is a seriously messy job so an oil drain collection pan is essential. I bought a 5-litre pan from Amazon which has several openings, making collecting and disposing of the old oil easier. The one I bought was a Sealey 5 litre Drop06 which you can find here. However, bear in mind the amount of engine oil your vehicle takes. If it's 6 litres, for example, you'll need a bigger capacity pan and always have it slightly bigger for any potential excess. If you had a 6 litre engine oil capacity I could opt for a 7 litre drain pain.
4) Jack stands, axle stands or wheel ramps: You need to get your vehicle up so you can access it underneath. If it's a smaller hatchback wheel ramps are honestly the easier method. They're just ramps you drive the front wheels up. You can get 2 tonne car ramps from Halfords (1 tonne per wheel). If you have a car that is bordered on 2 tonnes or over, you will need to get a jack stand and some strong axle stands.
In terms of safety, the ramps by themselves will be fine but if you're anxious you can always buy some axle stands as well as a safety precaution (in case the ramp failed!). You can get heavy-duty axle stands from Amazon that hold a total of 3 tonnes. Toolstation has a pair of 2-tonne axle stands, as well as a 2-tonne jack stand, if you prefer not to use Amazon.
5) Correct socket and torque wrench: To empty your old oil you will need to undo a nut called the 'oil drain plug' under the car to let the old oil drain. To do this you simply need a wrench with the correct socket. In my case, I needed a 13mm socket for the oil drain plug on my Fiesta. When you have drained the car and need to screw the nut back in, it needs to be torqued (tightened) to specification.
This can be a bit confusing so I will attempt to explain it for you. I bought this torque wrench from Halfords. It uses a 3/8" Square drive. That simply means the sockets that will attach to the end will be 3/8". When looking for a socket set you simply need to look for sets that are 3/8". Here's a set that is 3/8" and this set contains from 8mm all the way to 24mm. These sockets will fit on the torque wrench mentioned above. Most car oil drain plugs are between 10mm and 20mm so there will be a socket in here for your own car's oil sump plug.
6) New oil drain sump plug or a new washer: Oil sump plugs come in two types. You have integrated rubber o-ring plugs which don't contain a washer and basic plugs which have a washer. A washer is simply a little ring that you put on the bolt. The washer becomes compressed over time and needs changing every so often (2 years I'd say), otherwise reusing it could cause a very small leak even if the plug is torqued correctly.
The best way to get the correct size washer is to visit your local dealership parts. The washer will be about £2 max. If you're lucky enough to have an integrated rubber o-ring, like my Fiesta does, you don't need to worry about the washer.
If you don't know what type of plug you will have, you can consult your manual or when visiting the dealership parts centre ask them what type for the year of your vehicle.
7) Rags, towels, a funnel, disposable gloves and a tarp: This can be a messy job the first time you do it. I would suggest putting a tarp under the vehicle once it's on a ramp or on the jack. This is to ensure if there are any spillages it goes on the tarp, not your drive or on the street. You don't want any oil on your hands either so disposable gloves will be helpful. You'll need a basic funnel when pouring the new oil into your car.
Preparing your car for the oil change
Now that you have all the parts and materials, we can prepare your vehicle ready for the oil change.
1) Get your car on the ramps or jack it up: First things first is getting your car in the car or up the ramps I mentioned earlier. If you're using jack and axle stands, ensure they go directly on the jack stand sections underneath the car's sides.
There are specific areas where the stands are meant to push the vehicle up. They are usually metal areas. Failing to put it correctly could involve the car falling or you cracking plastic parts of the bodywork, since the jack needs to push up against a metal surface. Simply find the points underneath before putting it on the jack.
The ramp is a bit easier, just drive it up slowly until you feel the car is high enough. Once you think you're high enough, put the handbrake on. If possible leave it in 1st gear and switch the car off. This prevents rolling. Get out and check to see if there's enough clearance for you to get under. If not, jump back in the car and slowly move it forward a bit more.
Once it's on the jack stand or the ramps, remember to put the axle stands underneath for extra safety. The axle stands go in the same spot as the jack stand does (the metal part).
2) Wait for the car to cool down: If you've been driving the car the oil will be hot. That's something you don't want to deal with when changing it. Give it a good hour or two once jacked up or on the ramps.
3) Get your tarp down underneath the front end: Once the engine has cooled sufficiently, throw the tarp underneath ready for you to lean on.
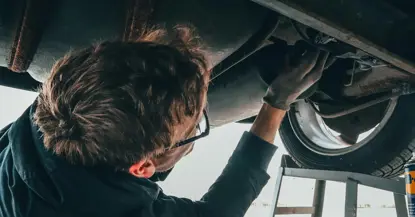
4) Get under and locate your oil sump plug: If you struggle to find this, which you probably will if you're doing it for the first time, consult YouTube with the make and model of your vehicle. Something as basic as "2016 Ford Fiesta oil change" will show you exactly where to locate the sump plug. But obviously put your own year, make and model of car instead of mine.
5) Position yourself and the drain pan: The oil will shoot out when you undo the bolt. It will drip as you loosen the nut and then shoot out a fair distance. What I did was use a 2-litre soda bottle and cut off the bottom. You can then use this as a filter of sorts for keeping the oil going down to your pan.
Doing the oil change on your car
Now that you have the parts and materials and have prepared your car ready, we will do the oil change.
1) Undo the oil sump plug using the torque wrench: It might be tight but slowly undo it. Remember lefty loosey righty tighty! Or anti-clockwise to loosen. You definitely don't want to overtighten a sump plug.
2) Remove the oil sump plug: As mentioned above, when you loosen it will drip but fully taking it off it will shoot out. Have the cut soda bottle I mentioned earlier ready to direct the flow of oil once you remove it and also be ready to adjust the position of your oil drain pan. This might be messy at first but you'll quickly be able to position everything to ensure it's all going into the drain pan.
3) Remove the old oil filter: Leave the sump plug somewhere safe and give it a good clean with a rag. Be ready to locate and remove the old oil filter. Generally, old oil filters should be easy enough to remove with a bit of force turning it anti-clockwise. But sometimes the previous person has put it on too tight. So you will have to use the oil filter removal tool I mentioned above.
Be aware that oil will drip once loosened and then go everywhere out of the oil filter once you remove it. For this reason, I recommend as soon as the oil filter is removed, hold it straight up as you lift it out of the engine housing. There will be oil inside the old filter, so holding it upwards and then lowering it slowly means it doesn't spill everywhere.
Another thing to be aware of is that the rubber o-ring seal around the oil filter has successfully come off with it. Sometimes the rubber ring can stick to the engine housing. The rubber is what causes the seal between the oil filter and the engine. So inspect the old filter after removal to ensure it still has the black rubber ring around it still, and that it isn't still on the oil filter housing area.
4) Let everything drain for an hour: With both the oil sump plug and oil filter off, leave it for an hour to drain all the old oil into the pan. It will be dripping but those drips add up after a while and you could gather 0.2 litres worth of excess within that time frame.
5) Screw the oil sump plug back in: This is why we have the torque wrench. Use your hand to screw the plug back in, remembering to put the new washer on if it uses one. Once it's hand-tightened we will then use the torque wrench to tighten it to spec. Generally, oil sump plugs are between 20 and 25 lb ft of torque. This is about a quarter turn after the plug is hand-tightened. This might seem like not much but there is no load bearing on the sump plug. It's just there to hold oil. I personally torqued mine to 23 lb ft and I was happy with that.
6) Screw the new oil filter in: Once the sump plug is done we'll put the new oil filter in. The oil filter must be hand-tightened and only hand-tightened. As mentioned earlier, the rubber ring around the entrance of the filter acts as a seal. Once the engine is heated up from running, the seal will form correctly and hold the filter in place.
What I personally do is make a mark on the oil filter housing using a marker. Then I hand-tighten the filter until it's snug. Then I will give it a full turn once with my hands. You are using the mark on the filter to see where you started the full turn from and whether or not you ended up back in the same spot. I couldn't get it back to the exact spot as it became too difficult. But as long as it's close to the original mark it will be tight enough.
Again, make sure the rubber ring from the previous filter isn't stuck on the engine housing area. You don't want two rubbers stuck to each other that would cause a leak. The rubber on the new filter will touch the metal part of the housing and then form the seal.
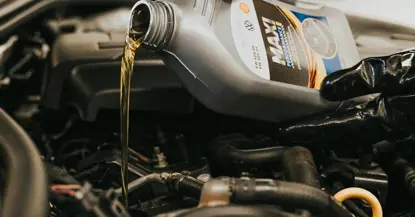
7) Add fresh oil via the oil fill cap area: Once you're happy that both the oil sump plug and filter are securely on, it's time to add the new oil. The new oil can be added via the oil filler cap under your bonnet and using a funnel to keep it from getting messy.
It's worth slightly underfilling your vehicle and then adding more. This is to prevent overfilling, as you would have to remove both the oil sump plug and oil filter all over again if you overfill.
For example, my Fiesta took between 4 and 4.6 litres according to the manual. So I filled it with 4 litres, switched it on and then reversed it off the ramp. I then left it for 30 minutes for all the new oil to drain back to the bottom and used the oil dipstick to check. It said it was on the L mark (low). So then I added 0.1 litres and kept checking the dipstick each time to maintain and accurate measurement.
One thing I recommend is to ensure your car is parked on a flat surface. This is because if it's angled, you might get an inaccurate reading on your oil dipstick.
In any case, if your car takes between 5.5 and 6 litres, I would fill it with 5.5 litres of fresh oil and then check, adding more if necessary (0.1 litres each time) and consulting your oil dipstick every time.
8) Inspect for any leaks: Finally, if you're worried, you can jack the car back up or drive it up the ramps again and inspect the sump plug and oil filter. This is just to ensure there is nothing leaking.
One thing that's worth mentioning is that there will be old oil leaking from the old oil filter change still. After I had done my oil change I left my car for an hour and came back to find a little pool underneath. But it was simply old oil that was on the frame underneath after I removed the old oil filter. It goes everywhere when you undo the old filter so it could be on the frame underneath and drip for a few hours, unless you really clean it up well with a rag.
9) Dispose of the old engine oil and old filter: Throw the old oil filter into a plastic bag. In the UK you can take car oil to the dump as long as it's from a personal change and not a business. I simply took my oil drain pan to the local waste dump and poured it into a large oil barrel. I put the old filter in a bin specifically for filters. Do not dispose of the oil or oil filter any other way, as oil is hazardous to the environment and animals.
When should I change my oil again?
Most manufacturers recommend every year or 10,000 miles. It really depends on how you use the car. Short journeys can degrade oil quickly. Plus once you know how to do the oil change for your car, it doesn't take long. If you value keeping your engine healthy and are going to keep the car for a long time, it's worth doing an oil change more regularly. Perhaps every 8,000 miles/year or even every 6,000 miles/year.
Most modern quality synthetic oils can last a long time inside our engines. But with the introduction of smaller litre turbo'd engines, they are stressed a bit more with high RPMs to get them moving.
Some engines even have a wet belt. Where the cambelts are drenched in the engine oil. This helps to reduce emissions and stops the belt from breaking as easily as a normal belt. However, the issue arises where dirty engine oil that isn't changed can damage the belt and cause catastrophic problems. Another reason to keep up with your oil changes regularly.
Conclusion
We hope that this guide on how to change the oil in a car helps you. There are many guides on YouTube for your specific vehicle that you can also watch.
Initially, there's a bit of monetary investment with regards to the cost of things such as the ramps, jacks, axle stands, torque wrench etc. But these are all one-time purchases. Once you have them you won't need to buy them again. All you need to worry about is new oil, a new oil filter and a washer if needed for future changes. I think for peace of mind it's worth investing in these parts.
Established in 2009, Stable Vehicle Contracts is a UK-based premium vehicle leasing company. We are part of a large, privately owned, Volkswagen and Audi dealership group with over 25 sites. Stable Vehicle Contracts has the ability to offer the very best car and commercial vehicle lease deals and thanks to our partners in the trade, we've become leaders in the supply of cars and commercial vehicles through leasing.
Give us a call today at 0151 728 4711 or visit our Special Offers page to see what deals we have on. Alternatively, signup for our leasing offers newsletter to get our latest deals delivered straight to your inbox.

